
Do you want the wording Copyright 2023 in your WordPress footer to be automatically updated to the current year? It may be accomplished using a shortcode – no plugins required. We will also provide you with more date formats, including the current date, month, and day. This entry was modified on 20-Dec-2022.
1. Traditionally: Add the current year using a unique code (for all themes and page builders)
All necessary code snippets are provided for copy-and-paste throughout the article. This is compatible with any WordPress theme, thus you do not need to utilize Divi from Elegant Themes.
Install a child theme prior to beginning.
Install a child theme on top of your parent theme before altering any PHP files. If not, your modifications will be overwritten the next time you update WordPress or your theme.
How to Create a Child Theme for WordPress :
Step #1: Enable shortcodes in WordPress widgets.
A shortcode is a fragment of code that shows dynamic data, such as the current date. A shortcode consists of a phrase surrounded by hooks, such as 2026, which, if appropriately implemented, shows 2022 automatically and is updated simultaneously with the New Year's Eve fireworks.
By default, the current version of WordPress permits shortcodes in widgets and in the body content. Therefore, you may proceed right to step 2 below. But if you're using an older version of WordPress, you must include this code first.
Fortunately, this can be altered with a few lines of code in functions.php. Beginning in the WordPress dashboard, navigate to Appearance > Theme Editor (or even better, use an FTP client or the file editor in your web hosting account). Then, in your child theme's functions.php file, append the following code at the end.
//Allow shortcodes in widgets
add_filter ('widget_text', 'do_shortcode');
Step #2: Generate your year-specific shortcode (and current month, current date or current day)
Next, add one or more shortcodes that display the current date. Copy the code below for the date formats you choose to use and paste it into the functions.php file of your child theme. Place the code behind the code added in the previous step. Save.
Code in functions.php:
Shortcode #1: 2026
Result: 2023
//Display current year
function year_shortcode () {
$year = date_i18n ('Y');
return $year;
}
add_shortcode ('year', 'year_shortcode');
Shortcode #2: June
Result: December
//Display current month
function month_shortcode () {
$monthyear = date_i18n ('F');
return $month;
}
add_shortcode ('month', 'month_shortcode');
Shortcode #3: [yyyymmdd]
Result: 2022-12-25
//Display current date as YYYY-MM-DD
function yyyymmdd_shortcode () {
$yyyymmdd = date_i18n ('y-m-d'); return $yyyymmdd;
}
add_shortcode ('yyyymmdd', 'yyyymmdd_shortcode');
Shortcode #4: June 2026
Result: December 2022
//Display current month and year
function monthyear_shortcode () {
$monthyear = date_i18n ('F Y');
return $monthyear;
}
add_shortcode ('monthyear', 'monthyear_shortcode');
Shortcode #5: [day]
Result: Sunday
//Display current day
function day_shortcode () {
$day = date_i18n ('l');
return $day;
}
add_shortcode ('day', 'day_shortcode');
It should look something like this if you’ve entered all the code above:

Modify language for the current year
Do you desire a different date format in another language? Simply navigate to your WordPress dashboard, select Settings, and change Site Language to the selected language. This will automatically update the date shown by your shortcodes (for all you code ninjas: this works because we're using date i18n instead of date in functions.php). Also ensure that the right time zone is selected for your website.

Step 3: Include the phrase "Copyright 2021 Company Name. All rights reserved" in your footer.
Now we are through with coding. Time to add the year shortcode to the footer. Navigate to Appearance >> Widgets. Take a Text Block and place it, for instance, in Footer Area # 1. In the text box, copy:
Copyright © 2026 Company Name. All rights reserved.Replace Company Name with the company's preferred name and save.
Following recent upgrades to WordPress 5.x and 6.x, the widget area is now built on the Gutenberg block editor. However, adding shortcodes above the Paragraph block works well. You may also add normal text before and after the actual shortcode using the Shortcode block.

That’s all for now. Good luck!
2. Use Divi instead of custom code
Since the release of Divi 4, you may design footers with dynamic content (such as the current year or date) using the Divi Theme Builder without a child theme or custom code.
Or check the Divi official guide here.
- Navigate to Divi » Theme Maker
- Insert or modify your Global Footer
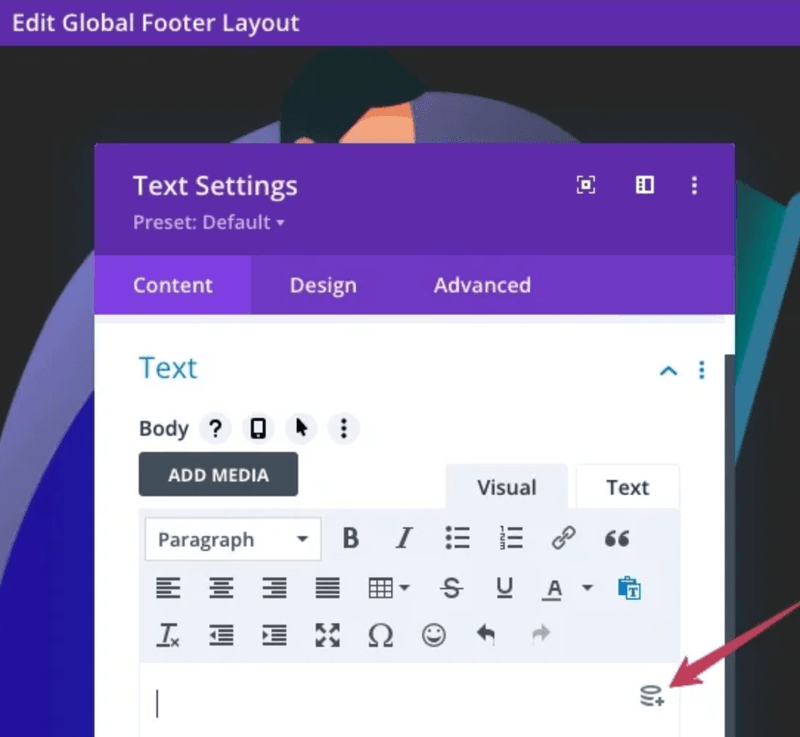
- Insert an additional Text Module
- Place the cursor over the text editor and click the Use Dynamic Content icon located in the upper right corner.
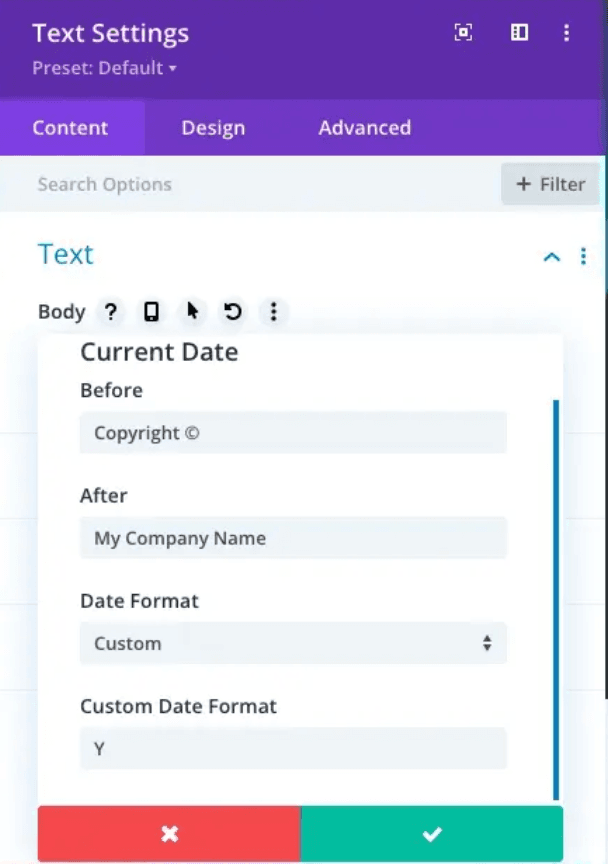
- Select the Current Date
- Add Copyright followed by a space to the Before box.
- Enter My Business Name (beginning with a space) in the After field.
- Select Custom from the Date Format drop-down menu.
- Add the letter Y to the field Custom Date Format
- Save and preview on the front end
That is all! The year will now be automatically updated in the footer. Obviously, you can also utilize this on pages and posts.
3. Add the Dynamic Year in Elementor
Follow the instructions below to add the Dynamic Year to the Elementor footer. It required 5 Steps.
Or check the guide on the official site here.
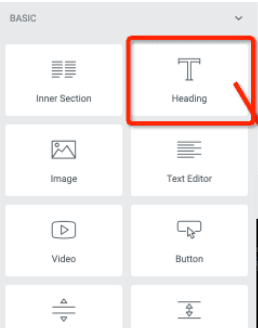
Step 3.1 – Title Widget
Drag the Heading widget to the location where you like to place your copyright information with the Dynamic Year in the Elementor footer.
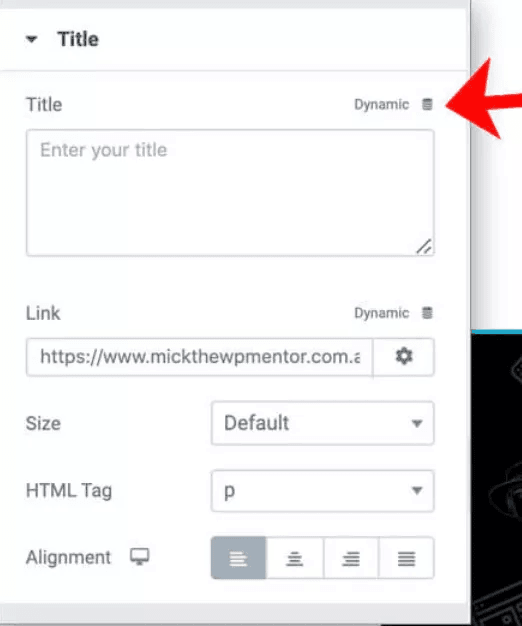
Step 3.2 – Choose Dynamic
Click the "Dynamic" term slightly above and to the right of the title section under the Content tab.
Observe: as seen in the picture Change the HTML element to P or DIV rather than H1, H2, etc.
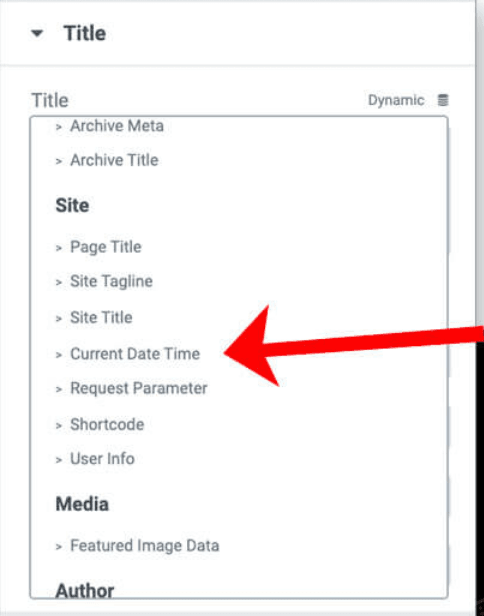
Step 3.3 – Select the Dynamic Option
When you click on dynamic, a number of options will appear; select Current Date and Time under the Site title.
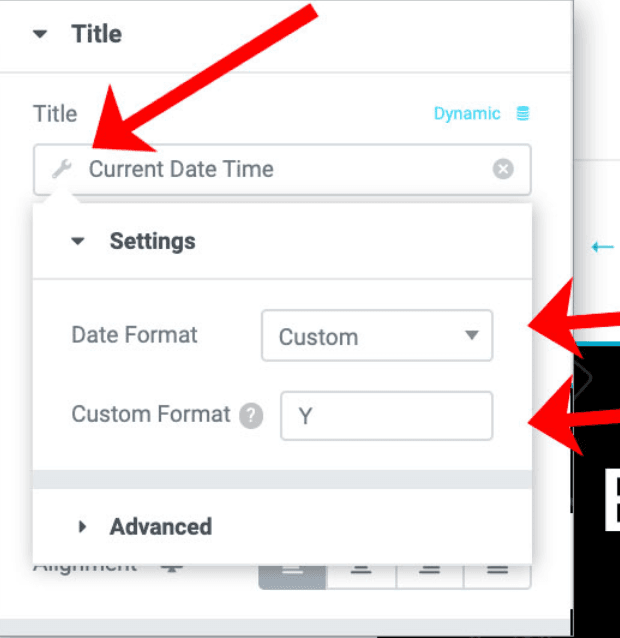
Step 3.4 – Date Format
To view the Dynamic Settings, click the Spanner symbol.
For the date format, pick Custom from the drop-down menu.
In the area for Custom Format, insert a capital "Y." (without the quotes).
(you ought to see the current year)
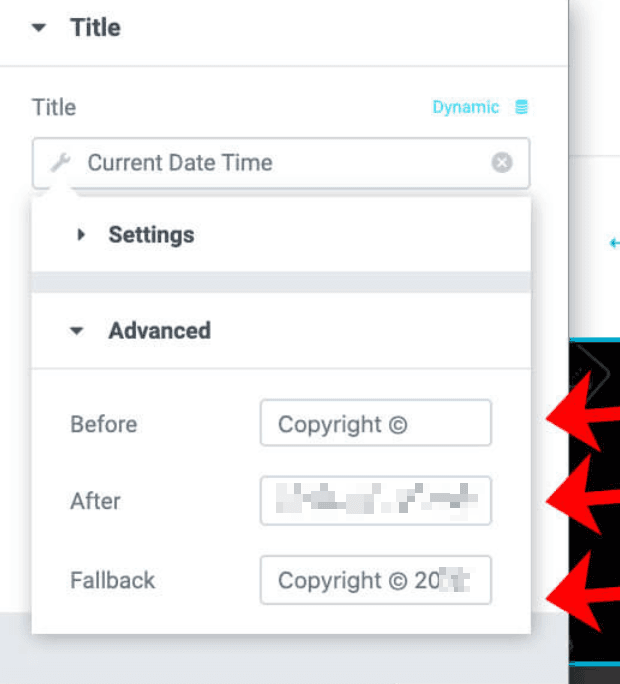
Step 3.5 – Advanced Settings
Select the Expert tab.
In the Before text section, write the text you like to appear before the year, for example "Copyright ©"
In the After text area, put the desired wording following the year, such as " | Your Company Name."
In the fallback field, insert text such as " Copyright 2022 | Your Company Name ".
4. Popular Theme ShortCodes:
- If you are using AstraWP, the shortcode is [current_year] – Get instructions
- If you are using OceanWP the shortcode is [oceanwp_date] – Get instructions
- If you are using GeneratePress you need to add it manually – Get instructions
The end of this tutorial!
I hope you enjoyed this article. Subscribe to the Managed-WP.™ Blog and join the WP Community group for further WordPress and web design-related material.