WhatsApp Cloud API officially launched in May 2022 and over 1 billion users use the app every day. Every day, these users send about 55 billion messages. With a WhatsApp Cloud API integration, you may begin to include your website and chatbot among the billions of messages.
Furthermore, WhatsApp Cloud API is not for 3rd party vendors(such as Twillio, 360 Dialog and WA Team. Known as Whatsapp Business API); there are now official WhatsApp Cloud API, making WhatsApp Business App (iOS/Android) officially supported 3rd party app integration via WhatsApp Cloud API.
What is the difference between WhatsApp Cloud API and Whatsapp Business API?
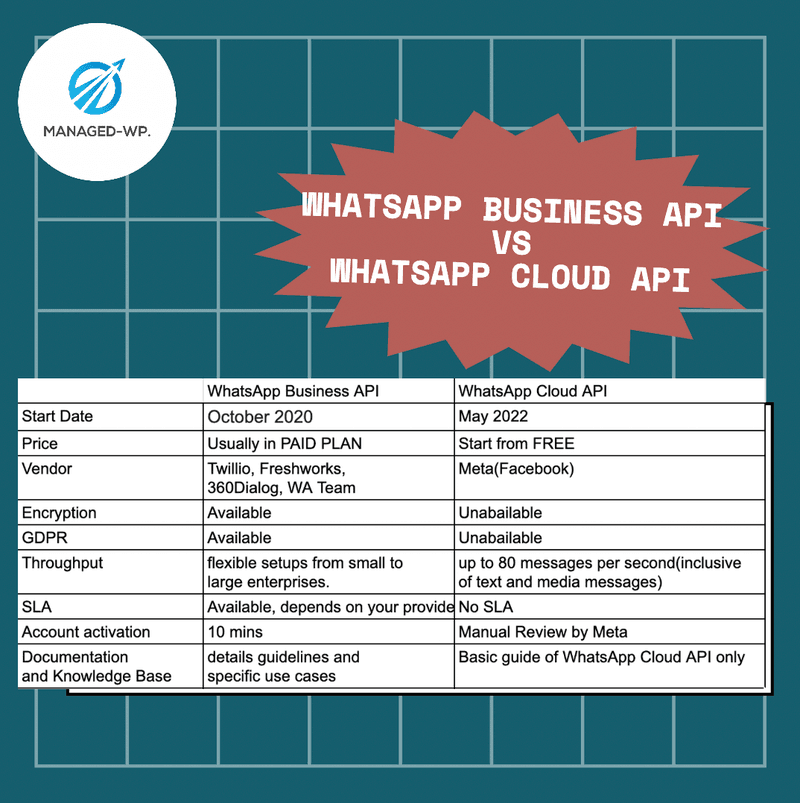
- Price: WhatsApp Business API is a paid subscription because providers need to maintain their own servers to operate the WhatsApp Business API service. Twillio offers WhatsApp Business API only, which is excluded front-end interface, you have to pick a chatbot provider, such as chatbot.hk.com, to have the chatbot front-end. Freshworks is the other world-leading chatbot solution provider that offers WhatsApp business API (check out Freshdesk Messaging). On the other hand, WhatsApp Cloud API has a free tier for all WhatsApp Business App (iOS/Android) users. WhatsApp Cloud API is supported by Pabbly Connect(webhook integration), Flowmattic (WordPress Plugin) and Chatbot.HK.com – a leading Chatbot solution provider in Asia.
- Encryption: WhatsApp Business API supports Encrypted WhatsApp Messaging. However, Meta WhatsApp Cloud API offers non-encrypted WhatsApp Messaging as messaging data is stored on Meta Servers
- GDPR: Some of WhatsApp Business API support local & Regional Hosting which is complied with GDPR. But Meta WhatsApp Cloud API offers US servers only.
- Throughput: WhatsApp Business API providers offer flexible setups from small to large enterprises. But Meta WhatsApp Cloud API offers standard throughput supports up to 80 messages per second of combined sending and receiving (inclusive of text and media messages).
- SLA: WhatsApp Business API Providers always offer standard support with predefined SLAs and escalation paths. But WhatsApp Cloud API has no SLAs and no personal support.
- Account activation: Activate a WhatsApp Business API account in less than 10 mins. However, WhatsApp Cloud API has a complex and fragmented account activation process in Facebook Business Manager.
- Documentation: WhatsApp Business API vendors offer details guidelines and specific use cases based on their experience in the last few years. But WhatsApp Cloud API has limited documents.
In the next paragraph, I'll show you how to integrate WhatsApp with WordPress in a variety of methods. While there aren't many alternatives, there are several ways to incorporate WhatsApp that go beyond simply social sharing.
What Are the Different Ways to Integrate WhatsApp Into WordPress?
You may set up a WhatsApp WordPress integration in a few different ways.
- Pabbly Connect via webhook
- Flowmattic – WordPress plugin for Whatsapp Cloud API and Woocommerce
- 3rd party unofficial WhatsApp API
Before we can send out messages via WhatsApp Cloud API. First of all, we need to generate WhatsApp Cloud API via Meta account.
Step 1: Setup Meta Business Account and generate WhatsApp Cloud API Token:
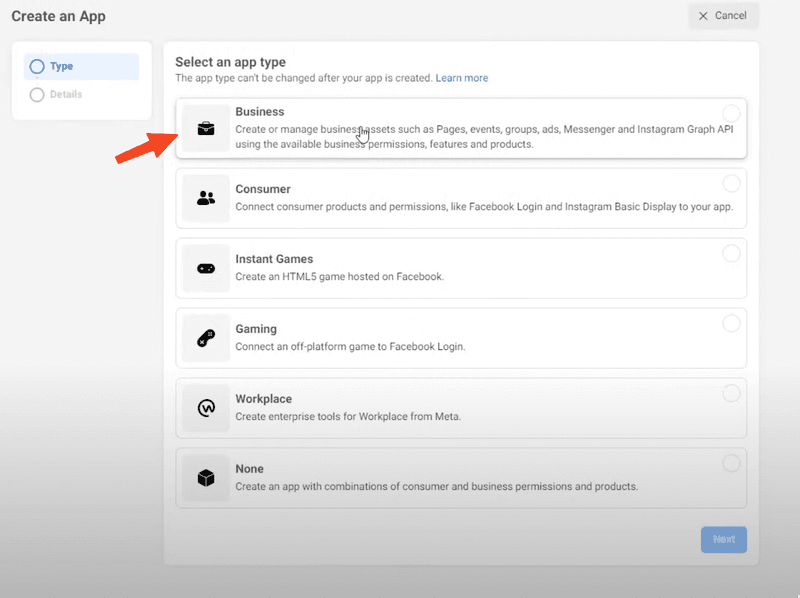
So we will be setting up the WhatsApp Cloud API. The first step involves going to https://developers.Facebook.com. Then click on the My Apps button on the top right corner.

Click on Create App.

Choose Business.
Click on Next, and enter the display name of the app. It can be anything that you want. If you have a business account you can select it. Otherwise, you can leave as it is.
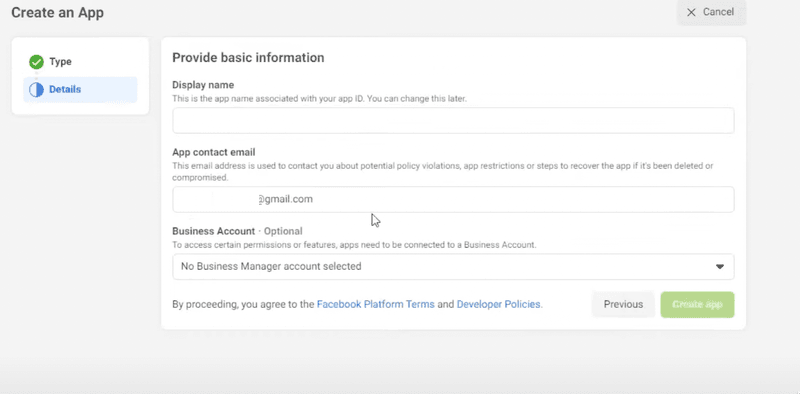
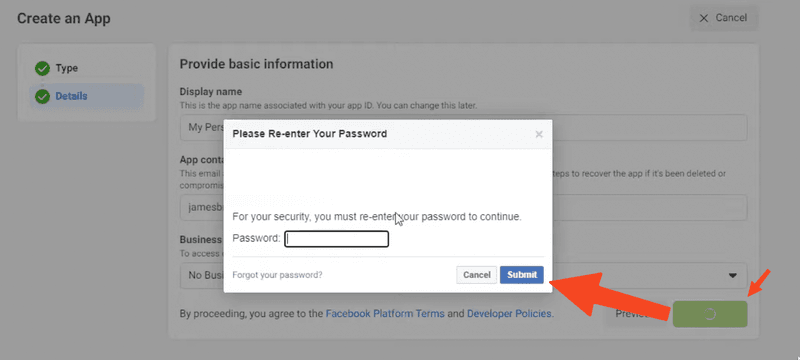
Click Create App, and Enter the password click on Submit.
Scroll down to WhatsApp and click on Set Up.

Then select a business account. If you don't have a business account you can leave as it is and Facebook will actually create a business account automatically for you. Click on Continue. It will take just a moment.

As you can see it has generated a test phone number for us and also provided us with a sample API call for sending a template message. We have to add a phone number to which we can send a test message and we have to verify that phone number to receive test messages. As long as it is a test number you actually have to verify it once for receiving the message on this number. So I have already verified it. You can click on Send a message and if you check the phone number WhatsApp you will actually receive the message right away.

Now Next I am adding a verification phone number verified phone number so that any messages will be delivered to my own mobile number. I'm adding my first number which already has a WhatsApp account and you can see it will give an error because it says this number is registered to an existing WhatsApp account so you cannot use the same number that has an existing WhatsApp account. So in this case you will have to set up a new mobile number and you will have to use that new mobile number with the WhatsApp API.
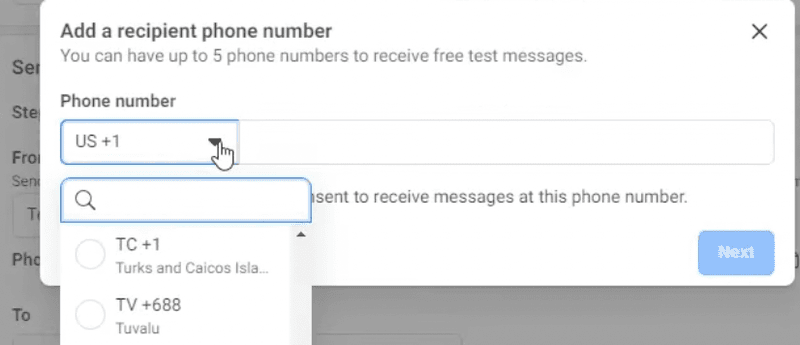
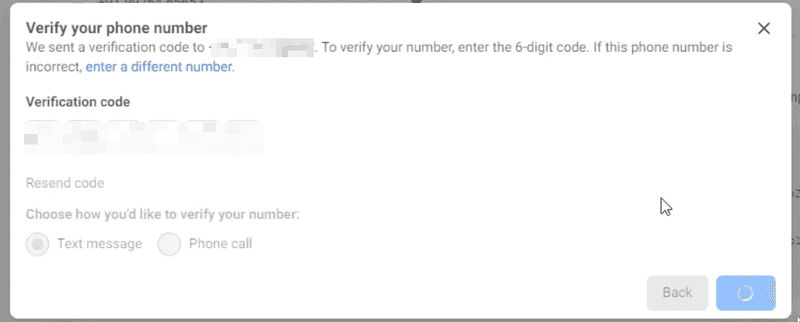
So I'm entering an entirely new mobile number. Clicking on Next an SMS message will actually arrive on this mobile number to verify a production mobile number. To send WhatsApp message. I will be entering the verification code now and I will click on Next to add the verification or the verified phone number to my account.
Step 2: Generate Permanent WhatsApp Cloud API Token Step by Step:
And the challenge is this token keeps on expiring every 24 hours. This means that this token is only valid for a period of 24 hours from the time it has been generated.

So instead of doing that, what we essentially want to do is we want to generate a permanent token so that the token remains the same and we can do as many API calls as we want to send any number of WhatsApp messages to the recipients. Now all you have to do is to generate a permanent token. You have to type in your URL as Developers Facebook.com.
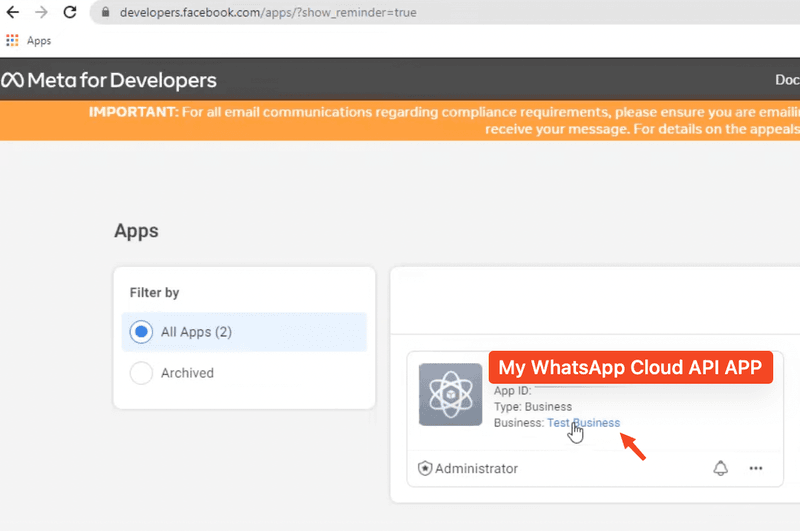
And as you type in https://Developers.Facebook.com, you just go to My apps. And inside my apps you will see the app name which you have already created for WhatsApp Cloud API account. Now inside this app you will see a business name for which this app is created as the Test business(you may have the other name). So all you have to do is just click on this Test Business app right here. Once you are on the business settings page for the Test Business app, you can see the test businesses populated automatically right here.
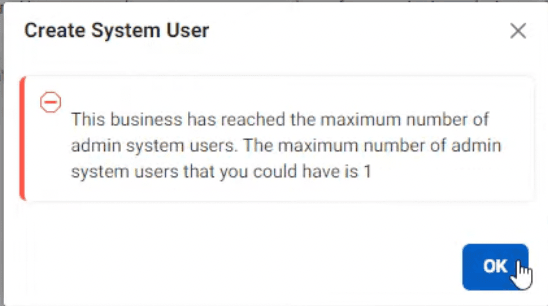
You have to go inside the System user setting. Now all you have to do is click on Add and your system user can be anything that you want. And you can define the system rule for this specific system user as Admin. And then you can create a system user. It says this business has reached the maximum number of admin system users.

The maximum number of admin system users that you can have is one.
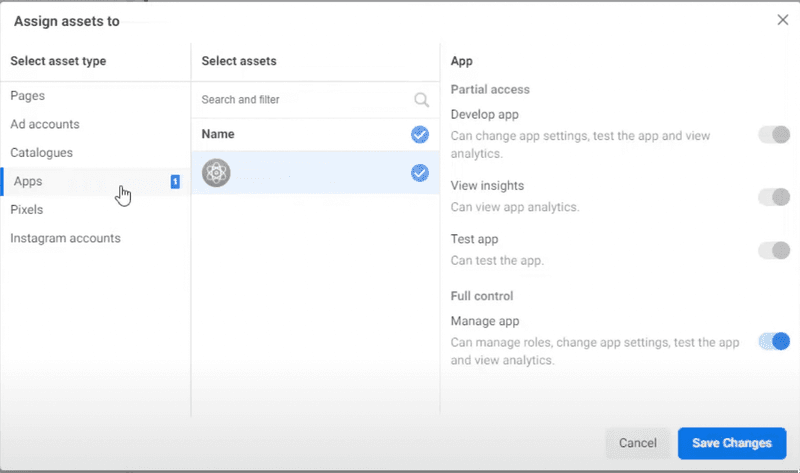
Now because I have reached the limit, what I will be doing is I will be using my existing system user. As soon as you press the Add button on the last screen you will be reaching this page as long as you just have one system user. All you have to do is you have to add asset to this specific system user. So just click on Add Asset right here under Apps.

Just Select the app(for example Whatsapp cloud API app) right here and you will give the full control of this app to this system user with admin right, then give all the permission and click on save changes. As soon as you do that you can see one app has been added to the person which is quite good for you because that is exactly what you wanted to do. Now as you can see, you can see all the permissions are right here.
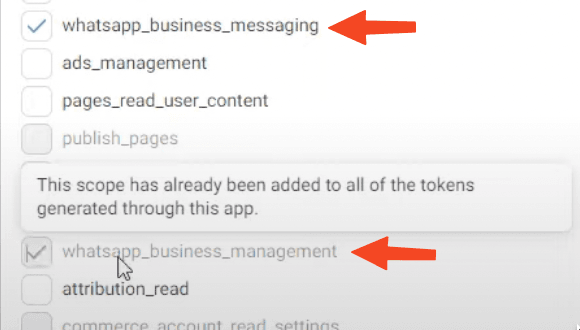
Now what you have to do is you want to generate a token that will be a permanent token and it can be used anytime that you really want to do. So you can see system users can only generate access token for permission. The app has been granted through the app review and which is okay with us as well. So what I'm going to do is I'm just going to click on Generate Token and I will be selecting the app to which we have provided the access. Now what we want to do is we have all the list of available permissions that are populated right here.
And out of all those permissions we have to select the WhatsApp Business messaging permission right here. The WhatsApp Business management needs to be selected as well. And as you can see the message says this scope has already been added to all of the tokens generated through this app. So make sure that this segment is also ticked in and you have to make sure that you are also taking in the WhatsApp Business messaging. I see that there are no other permissions.
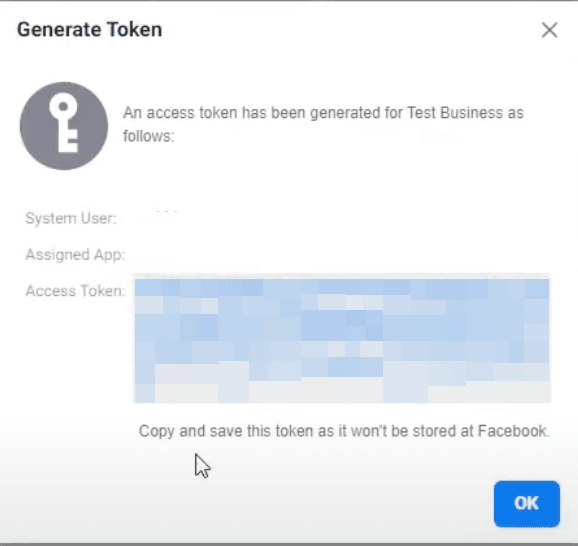
So I'm just going to click on Generate Token and you can see that token is generated right here. So what I will do is I will just copy this token. I will go to my notepad this token right here. Okay, so this is my token that has been generated. This is a permanent token which allows me to make as many API calls as possible through this WhatsApp account.
Method 1: Pabbly Connect (Webhook)
Let’s check how we connect Whatsapp Cloud API via Pabbly Connect
Now all I need to do is to connect this number to Pabbly Connect and I can send messages right away. You can see the from number is added on the top. Once the number is verified and added right here, I will show you how you can send a message through this number to any WhatsApp number. All you have to do is just copy this entire request right here and just open up a notepad and paste this request here. The first thing that you have to do is you have to remove all the slashes that are appearing right here. So what I'm going to do is I'm going to do a find and replace. I will be doing CTRL F and replacing all the slashes all the forward slashes with blank. Click on replace all.
So that way my entire slashes will be removed from the data which is shown by the D symbol right here. Now what I will do is I will open up the Pablo Connect dashboard right here. I will be creating a new workflow by the name of anything that you really want. So WhatsApp Cloud API? The name is WhatsApp Cloud API and I am clicking the Create button. You can choose any trigger that you want. I am choosing a webhook as a trigger and if you want you can send some messages across to what webhook. This webbook will work in any case when you are receiving any new form entry from anywhere. So I'm just copying this web URL and sending some message which happens to be named is equal to Niraj. Now, this is just a simple message. You don't have to worry about that trigger here. You can use whatever trigger you want to get. But essentially what we are interested in, we are interested to send a message. So I will be using the action step and I will be using the API module right here. Click on API module. The action event will be a custom request.
The method will be posted. The endpoint URL will be something that you have right here. So just copy this endpoint URL and paste it here. Next, you have to choose the authentication as Bearer Token. Go back. The Bearer Token is right here. Just copy this Bearer Token from the first letter until the last letter without the quotes. So just paste it here. And lastly, you have to paste the data. So you just copy this data from right here until the last curly bracket before and after the single quotes. So just copy it. Just paste it here. And once paste it what you can do is you have to mention the number to which you want to send the message. So I'm sending this number to nine 1992-646-5653. This is essentially my number and what you can even do is you can just map this number which is coming from the trigger step. So if you have the number right here we can just use the trigger step and map the number from the step above. All you have to do is click on Save and send a test request. As soon as you do that you will see that a message has been sent and my WhatsApp web has pinked right here.
I will show you once clicking here and you can see the message is right here which says welcome and Congratulations. Does this message demonstrate your ability to send a message notification from WhatsApp business platforms? Cloud API. Thank you for taking the time to test with us. Now go back to Public Connect. We have successfully tested the API and we were able to send the message. One thing I wanted to show you is the template that we sent right now. Actually, the first conversation that you are doing with the customer will actually happen with a template message. The template message needs to be pre-approved by Facebook. Only the pre-approved messages can be sent to any customer to initiate a conversation. Okay. And then unless the customer does not reply back to your first template message, you can't convert with them any further. So in this specific case, the template by the name of Hello World is something that we have sent to the customer and that is the exact same message that is received on WhatsApp you can create any number of template messages here by clicking this button which is appearing here. You can just click it here.
And these are all the template messages right now. The template that we sent to us. Hello World. If you click here you can see the message of the body was welcome and Congratulations. This message demonstrates your ability to send a message notification from WhatsApp business platforms cloud API. Thank you for taking the time to test with us now. Interestingly. If you really want to create another template message, all you have to do is click on Create message template. You can choose the category type of the message template. In this case, I'm choosing an Alert update. Then you can write the name of the template which can be anything that you want. So I can write an Alert update for an order. Okay, so Alert update. For order, I can choose the language which will be English US. Then I will just click on Continue. If I want to send some files which might include the invoice of this order you can include the file as well. So in the header, you can add a media file and you can say that I want to send a PDF. So Select Document. The right side shows you how your message will look once it is getting inside the customer's mobile.
You can get started by using WhatsAppCloud API inside Pabbly Connect with below video tutorials –
- Complete WhatsApp Cloud API Setup
- How to generate permanent token for WhatsApp Cloud API?
- Send Instamojo Order Confirmation on WhatsApp Automatically (via Official WhatsApp Cloud API)
- Send Meeting Details from Google Calendar on WhatsApp with WhatsApp Cloud API
- Get Automatic WhatsApp Reminders for Google Calendar Events Using WhatsApp Official Cloud API
Method 2: Flowmattic – WordPress plugin for Whatsapp Cloud API and Woocommerce
Messages are sent and received using a cloud-hosted version of the WhatsApp Business Platform. The Cloud API enables you to build WhatsApp Business APIs without the cost of hosting your own servers, as well as grow your business messaging more effectively. The Cloud API can send and receive messages at a rate of up to 80 messages per second (inclusive of text and media messages). The good news is, WhatsApp Cloud API connection is now available!
Using FlowMattic, you can now integrate WhatsApp Cloud API with your WordPress and Woocommerce site for free. The integration provides you with the following actions, which are superior to those provided by any other platform that integrates WhatsApp Cloud API :
- Send a Message Template
- Sending Text Messages
- Send a Picture Message
- Make a video message
- Document Message Send
You no longer need to rely on third-party services to provide WhatsApp updates to your clients:)
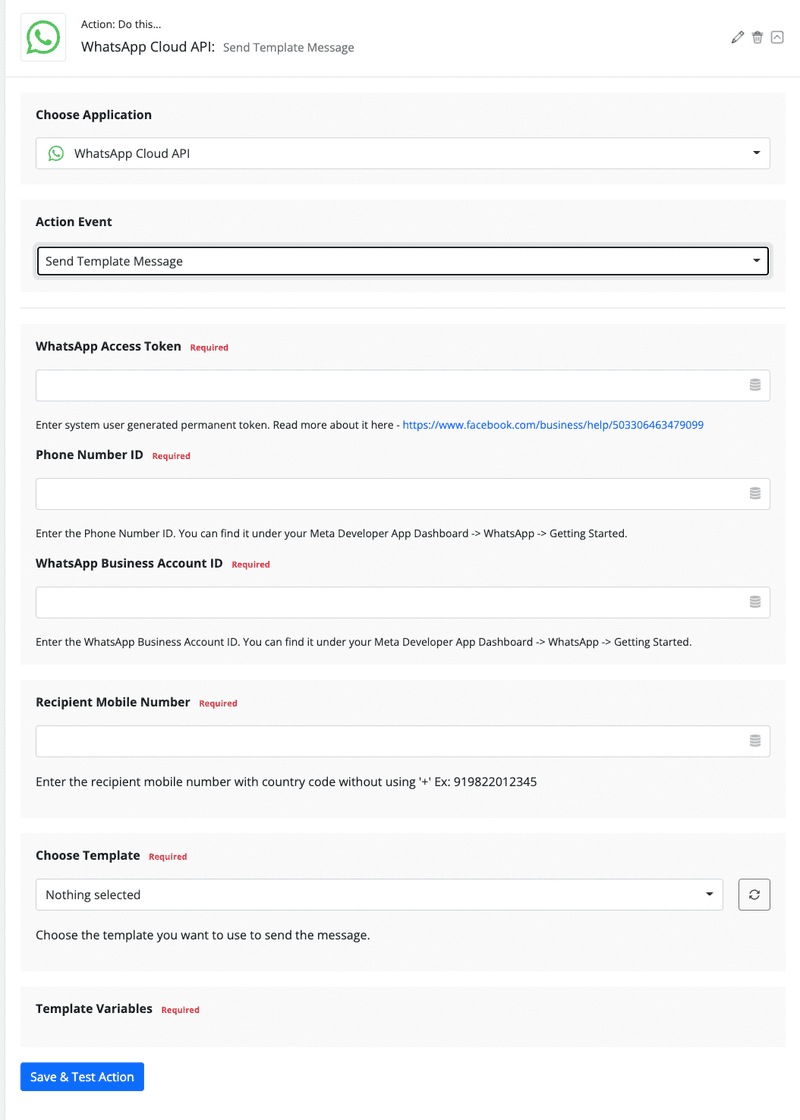
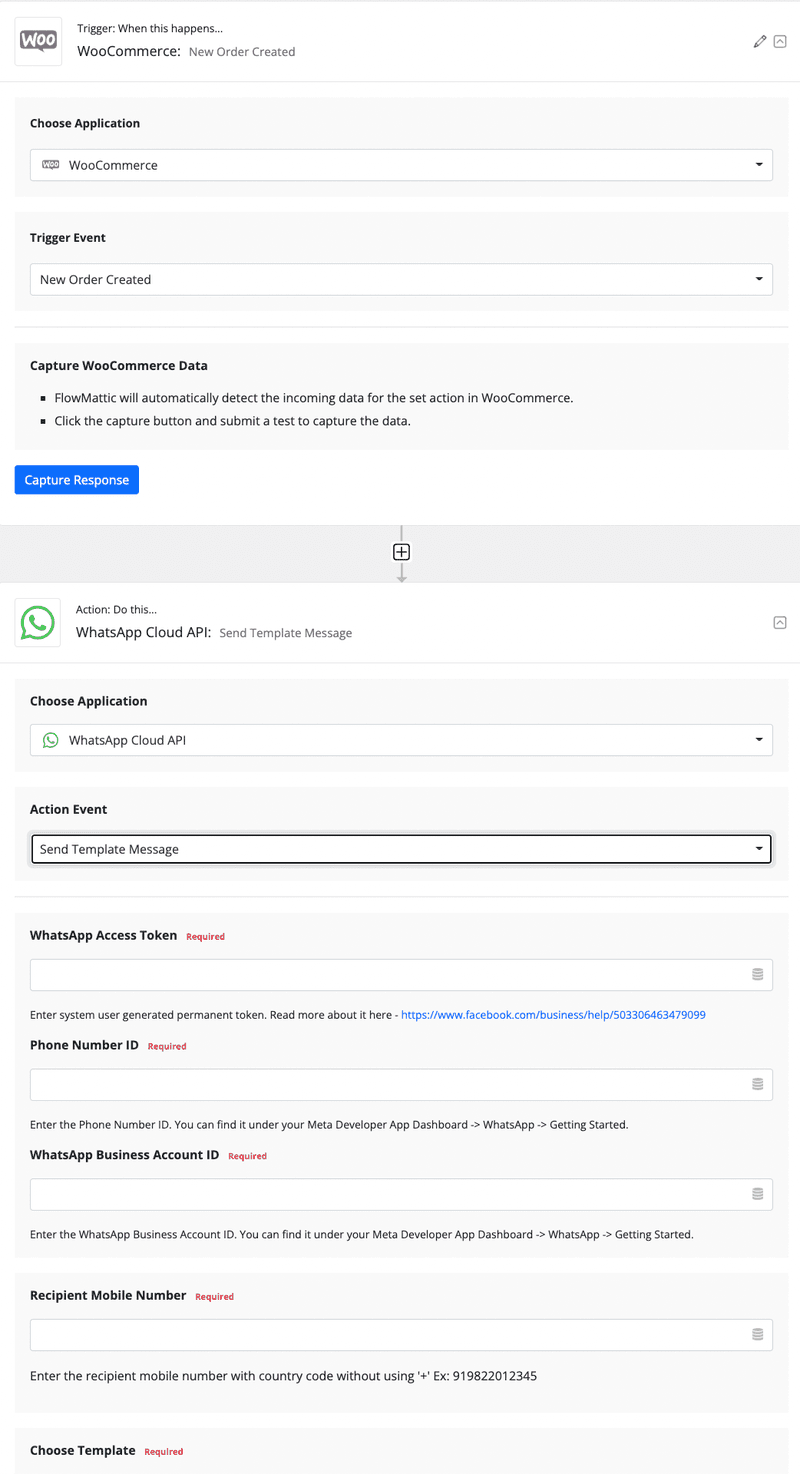
To access the WhatsApp Cloud API, you must first build an app in Meta Developer as well as a business profile. More information regarding Cloud API may be found at https://developers.facebook.com/docs/whatsapp/cloud-api.
For your convenience, here is a link to the WhatsApp Cloud API integration page: https://flowmattic.com/integration/whatsapp-cloud-api/.

We'll be writing a documentation page to assist you in getting started with WhatsApp Cloud.
Method 3: 3rd party unofficial WhatsApp API
Many people who have been utilizing ChatAPI's Unofficial WhatsApp API solution for sending WhatsApp messages have reported that their unofficial WhatsApp API has ceased working.
We propose that you utilize another WhatsApp API solution, such as the official WhatsApp Cloud API, 360Dialog, or one of the other solutions that we integrate with.
Get start the WordPress WhatsApp Integration now!
You are welcome to claim free credit if you would like to test WordPress x WhatsApp Cloud API Integration. Chat with our team if you need any demo or enquiry. Create your Managed-WP.™ PRO account with code “TRIAL10” and get $10 free credit now!