如果您正在寻找 VPS/本地服务器上的手动 WordPress 安装指南,请查看以下步骤:
自 2003 年诞生以来,WordPress 一直是建立和运行时尚网站的最佳和最简单方法之一。事实上,最近的趋势表明它的受欢迎程度正在不断提高。WordPress 易于使用,自己托管并不困难,我们将在本文中向您展示。
在这篇文章中,我们将向您展示如何在 Ubuntu Linux 上托管您的 WordPress 网站。我们将安装 Apache 作为我们的 HTTP 服务器,以及 PHP 和 MariaDB(一种开源 MySQL 实现),因为 WordPress 需要它们。这组程序通常被称为 LAMP 堆栈(Linux、Apache、MySQL、PHP)。安装这些程序后,我们将在安装 WordPress 之前介绍 Apache 和 MySQL 设置,包括初始数据库和用户设置。最后,我们将教您如何安装自签名 SSL 证书或从 Let's Encrypt 获取免费证书,以允许您的网站使用 HTTPS。
本教程将教您:
- 安装和配置 Apache
- 安装和配置 MariaDB for MySQL
- 如何创建 WordPress MySQL 用户和数据库
- 如何获取和安装 WordPress
- 如何在 WordPress 网站上安装自签名 SSL 证书
- 如何设置 Let's Encrypt 免费 SSL 证书
1.安装和配置Apache:
第一步是在我们的 Ubuntu 机器上安装必要的软件包。只有当我们为 WordPress 提供 HTTP 服务器、PHP 及其相关模块以及 MySQL 数据库时,WordPress 才能运行。要安装 Apache、PHP 和 MariaDB(MySQL 的开源分支),请打开终端并输入以下命令:
$ sudo apt 更新
$ sudo apt 安装 apache2 php libapache2-mod-php mariadb-server mariadb-client php-mysql php-curl php-xml php-mbstring php-imagick php-zip php-gd
要安装的软件包数量很多,而且都是必不可少的。除非您安装更多 PHP 模块,否则您将无法在 WordPress 管理员仪表板的“站点健康状态”区域获得满分。
2.安装并配置MySQL的MariaDB:
初始步骤之一应该是准备我们的 WordPress 数据库。为此,我们必须首先执行一些基本的 MySQL 配置。首先,在终端中输入以下命令:
$ sudo mysql_secure_installation
将第一个响应留空后按 Enter。您应该对其余提示回答 y(是),并在需要时设置 root 密码。此设置只需几秒钟即可完成。
虽然以下配置对我们的 WordPress 网站来说已经足够了,但如果您想更深入了解,您可以阅读我们关于在 Ubuntu Linux 上安装和配置 MySQL Workbench 的文章。
3.创建 WordPress 数据库:
MySQL 是 WordPress 保存其所有帖子和页面内容以及其他信息的地方。通过以下步骤,我们将创建一个 MySQL 用户和数据库供 WordPress 访问:
首先以 root 用户身份启动 MySQL:
$ sudo mysql
创建一个新的 WordPress 数据库。在此示例中,我们将其命名为' wordpress_db,但您可以随意称呼它。
MariaDB [(无)]> 创建数据库 wordpress_db;
接下来,我们需要建立一个新用户,WordPress 可以使用该用户访问新形成的数据库。在本例中,我们将使用用户名 wordpress_用户 和密码 我的密码. 将以下文本替换为安全密码(并将其保存在安全的地方):
MariaDB [(none)]> 创建用户 'wordpress_user'@'localhost' 由 'my_password' 识别;
然后,为 WordPress 用户提供对 WordPress 数据库的完全访问权限:
MariaDB [(none)]> 授予 wordpress_db.* 的所有权限给 wordpress_user@'localhost';
最后,保存对用户权限的修改并退出 MariaDB:
MariaDB [(无)]>刷新权限;
MariaDB [(无)]>退出
4.设置Apache:
此时,Apache 应该已经安装并运行,您可以通过打开浏览器并访问环回地址 127.0.0.1 或系统上的 localhost 来确认。
尽管 Apache 已经托管了我们的网站(或没有托管),但为我们的 WordPress 安装创建一个新的 Apache 虚拟主机文件是一种很好的做法。例如,如果您想要托管多个网站或修改 WordPress 目录的位置,这将为您提供更大的自由。
步骤 1:使用以下命令,将默认 Apache 配置复制到新文件中:
$ sudo cp /etc/apache2/sites-available/000-default.conf /etc/apache2/sites-available/wordpress.conf
第 2 步:在 nano 或您喜欢的文本编辑器中打开此文件:
$ sudo nano /etc/apache2/sites-available/wordpress.conf
步骤 3:更改 文档根目录 设置为我们打算安装 WordPress 的位置。我们建议使用下面列出的目录。
文档根目录 /var/www/wordpress
步骤 4:创建 ServerName 选项并输入您网站的完全限定域名。如果您没有,请使用 localhost。
服务器名称 mydomain.com
步骤 5:另外,为 万维网 前缀。如果您仅使用 localhost,则无需这样做。
服务器别名 www.mydomain.com
完成后,您的配置文件应如下所示。由于我们仅在本地托管,因此我们在配置中注释掉了别名行。
步骤 6:保存修改,然后关闭文件。然后,在 Apache 中启用站点并禁用默认站点。
$ sudo a2ensite wordpress.conf
$ sudo a2dissite 000-默认.conf
第 7 步:重新启动 Apache 以使新的更改生效。
$ sudo systemctl 重新加载 apache2
5. 应下载并安装 WordPress。
现在我们的 HTTP 服务器已经配置完毕,并且 PHP 和 MySQL 已启动并运行,我们可以继续安装 WordPress。
步骤 1:使用 获得 获取最新版本的 WordPress:
$ wget -O /tmp/wordpress.tar.gz https://wordpress.org/latest.tar.gz
第2步:提取tar归档入支目录如下:
$sudo tar-xzvf/tmp/wordpress.tar.gz -C/var/www
步骤3:确保目录及其所有文件具有必要的权限。
$sudo chown-R www-数据。www-数据/var/www pc
步骤4:我们现在可以开始设置。 打开你的网络浏览器和去localhost地址127.0.0.1或者,如果你有一个,你完全合格的域名。 WordPress设置导应该迎接你。 开始,点击"我们走"
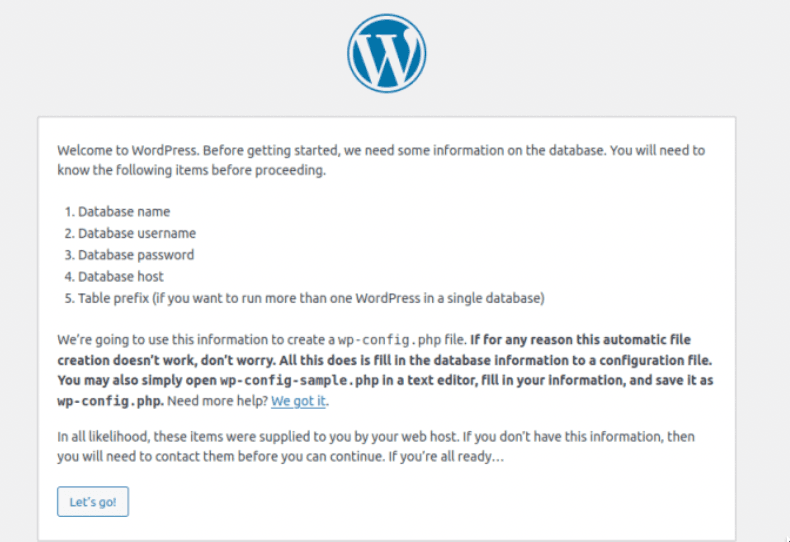
第5步:输入数据库的信息,你先前的指定。 最后两个项目(数据库的主机和桌前缀)可以单独留在家中。 当你完成后,点击"提交"。
步骤6:自举将尝试连接的数据库,并通知你,如果它是成功的。 假设它是,继续通过点击"运行安装。"
步骤7:下面将请求一些一般信息,你的新网站。 当你完成后,点击"件"在屏幕底部完成安装。
步骤8:无安装现在是结束! 你可以开始创建内容,通过点击"记录"按钮。
步骤9:请记住,你总是可以利用的URL http://127.0.0.1/wp-admin 回到台管理小组在未来(或替换127.0.0.1与你充分合格的域名称,例如mydomain.com).
你现在应该能够访问您的支通过http://127.0.0.1 或者你完全合格的域名。
6. 设立了一个自签署SSL证书。
我们已经完成了配置我们的网站,但是它仍然利用HTTP而不是HTTPS。 有这么多的网络转移到HTTPS,您可能想要考虑它对你的网站以及,即使它不是绝对必要的。 在这部书,我们会教你如何使用自签发的证书以使SSL在你的网站上。
步骤1:为产生自签证,输入以下命令的终端。 你只是问了几个一般性问题。 确保进入你的网站IP地址或域名的"共同名称"一栏中。
$sudo openssl req-x509节点-天365-newkey rsa:2048-keyout/etc/ssl/私人/apache-selfsigned.关键出/etc/ssl/cert/apache-selfsigned.crt
第2步:我们必须作出一些调整我们的Apache网站设置。 与纳米或另一个文本编辑器,打开默认SSL配置文件:
$sudo纳米/etc/apache2/网站可用/default-ssl。conf
步骤3:改变DocumentRoot价值的位置WordPress是预先安装。 然后,修改了sslcertificatefile和SSLCertificateKeyFile值的要点的位置我们的SSL文件。
文档根目录 /var/www/wordpress
了sslcertificatefile/etc/ssl/cert/apache-selfsigned.crt
SSLCertificateKeyFile/etc/ssl/私人/apache-selfsigned.关键
步骤4:保存修改,然后关闭该文件。 然后,对修改生效,使SSL module for Apache和重新启动:
$sudo a2enmod ssl
$sudo该重新启动apache2
步骤5:最后,激活我们创建的SSL站点并重新启动Apache:
$ sudo a2ensite 默认 ssl
$ sudo systemctl 重新加载 apache2
全部完成。您的 WordPress 网站现在可以使用 SSL 加密:
7.配置Let's Encrypt免费SSL证书。
Let's Encrypt 是一项免费服务,可为网站提供 SSL 证书。如果您已经完成了这一步并在 Ubuntu 上设置了 WordPress 网站,则只需再执行几个步骤即可建立 SSL 加密,这可以防止中间人攻击、改善页面的 SEO,并防止 Firefox 等浏览器警告用户您的网站不安全。
这个过程很简单并且可以完全从Ubuntu的命令行。 按照下面的步骤,以完成安装SSL证书从我们加密在你的网站上。
步骤1:使用以下命令安装certbot软件,以使用Let's Encrypt启用SSL加密。
$ sudo apt 安装 certbot python3-certbot-apache
步骤 2:通过运行以下命令并按照出现的提示配置 SSL 证书。最后一个问题将询问您是否希望将 HTTP 查询重定向到 HTTPS。建议您选择此选项。显然,域必须正确指向我们公开可见的服务器 IP 才能正常工作。
$ sudo certbot--apache
事情就这样结束了。 certbot 该实用程序实际上为我们完成了所有繁重的工作,对您的 Apache 虚拟主机文件进行了所有必要的调整。它还会在您的 SSL 证书到期时进行续订,使其保持有效。
为什么您应该选择 Managed-WP.™ PRO?
您无需花费数小时设置 Ubuntu Linux 操作系统、Apache Web 服务器、MySQL 和安装 WordPress。我们提供 WordPress 即服务, 在几分钟内部署完全优化的 WordPress。 请检查以下步骤并以最简单的方式启动您的 WordPress 网站。
检查以下步骤:
步骤 1:打开 https://pro.managed-wp.com/dashboard
第 2 步:点击“添加站点”

步骤 3:在下面输入站点名称、URL 和所需信息。
步骤4:选择所需资源。
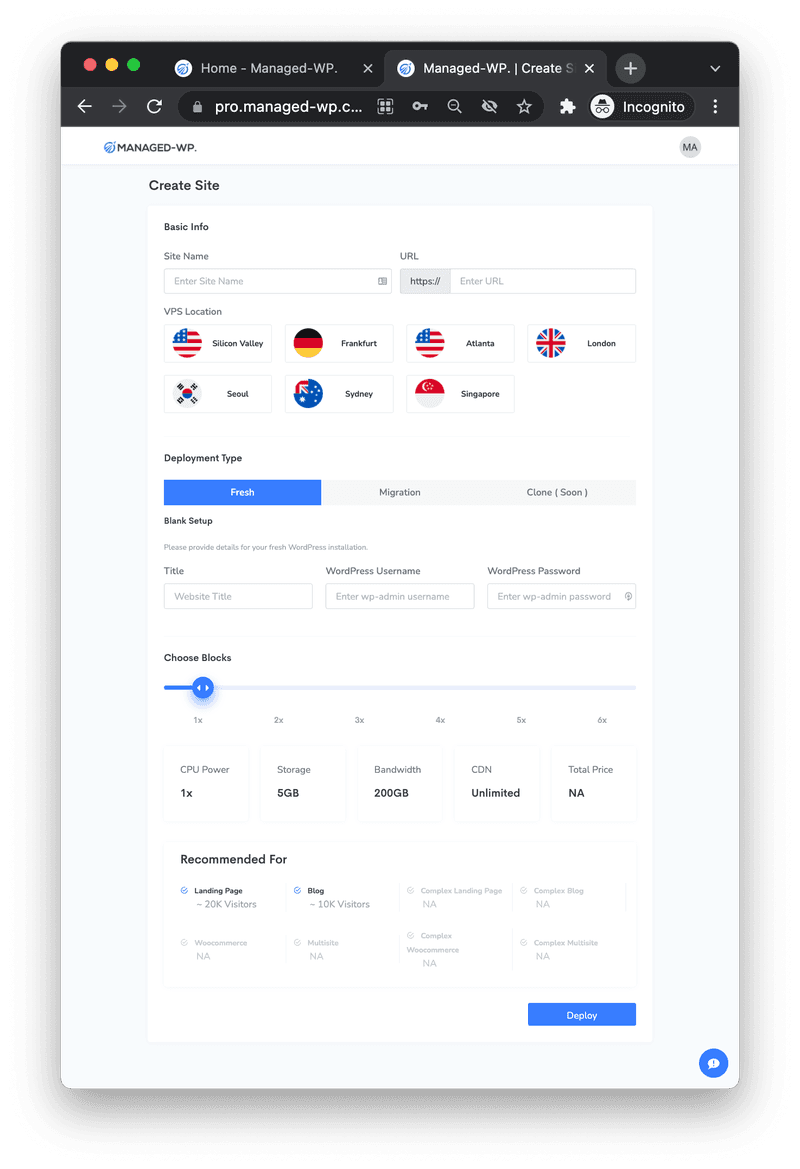
步骤5:最后,单击“部署”,WordPress 设置在几分钟内将完成。
步骤6:连接主域并启用SSL:
创建新的 WordPress 网站后,您将看到一个通知栏(红色)。
- 单击它,您将看到启用实时域的弹出窗口。
- 根据弹出窗口中的信息更新 DNS 记录。
- 如果您没有使用Cloudflare或者无法成功连接,请点击“显示没有Cloudflare的Rocoard DNS>>”
- 然后点击“ENABLE SSL”为连接的域名生成免费的SSL证书。

步骤 7:(可选)连接主域:
- 访问 https://pro.managed-wp.com/domain
- 添加第二个自定义域名,在“自定义域名”中输入域名,然后点击“添加”
- 点击“类别”下的“列表”,您将看到所有连接的域。

提示:创建您的 管理-WP.™ PRO 使用代码“TRIAL10”注册账户即可获得$10免费积分!